 |
Open Online Education
|
Open Online Education-
Course Builder 1.11
- Meet Course Builder
- Set Up Course Builder
- Create a Course
- Customize Course Style
- Debug Course
-
Prepare for Students
- Registration
- Student Groups
- Certificates
- Invitations
- Forum
- Announcements
- Search
- Translations
- Publish a Course
- Analyze Data
- Administer Site
- Upgrade Course Builder
- For Course Builder Developers
- Feature List
- Release Notes
Registration
Registration offers benefits for students and course authors:
Students can:
- receive course-related communication from the course author
- keep track of their progress through the course
- earn certificates on successful course completion
Course authors can:
- keep track of student event data to analyze and improve the course
- communicate with students taking the course
For each course, you can control whether registration is offered, who can register, and what unregistered visitors can see. Learn more about registration options and course availability.
To customize your course’s registration, you can change its registration settings.
Student Experience
When registration is available for a course, visitors can click Register on the course homepage or on the course explorer to reach the registration page.
Registration page
On the registration page, they answer one or more questions and enroll in the course.
You can customize the registration experience in your course’s registration settings.
Progress tab
When a student enrolls in a course, a Progress tab appears on the course navigation bar.
In the Progress tab, students can see information and take action with regards to the course.
Learn more about the Progress tab.
Registration Settings
Go to Settings > Registration to
-
enter introductory text that appears at the top of the registration page
-
add custom questions to the registration page
-
set up a welcome email that will be sent to each student who enrolls in the course
Introduction
Enter text that students will see at the top of the page before the default question and any additional questions you add.
Registration Form
Before a student registers, he or she is asked to enter his or her name. This is the default registration question.
You can ask additional questions by adding them to the Registration Form setting. Additional questions must be entered as HTML. See the next section for an example.
Offering a choice of tracks
If your course offers distinct tracks, you can ask students a question to determine which track they should follow.
Here is an example of HTML entered into Registration Form. This HTML form presents an additional question during registration and uses the student’s answer to assign the student to one of two tracks:
<li><label for="labels">
<b>What is your goal for taking this course?</b></label><br>
<input id="quit_alcohol" type="radio" name="labels" value="5079956455424000">
<label for="quit_alchohol">Quit Alcohol</label><br>

<input id="quit_smoking" type="radio" name="labels" value="5709255063633920">
<label for="quit_smoking">Quit Smoking</label><br>

</li><br>
Here is what a registering student sees:
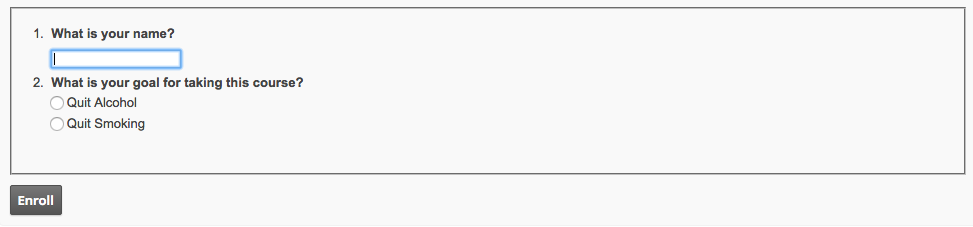
The HTML consists of three labels and two input buttons wrapped in a list item
(<li>). The list item is important because it appends the additional
question (“What is your goal for taking this course?”) to the numbered list of default
registration questions.
The input radio buttons each have a value attribute. The value is the
track’s key.
Assigning the track key to the input’s value is all you need to do. Course
Builder recognizes the value as a track key and automatically selects that track for
the student.
Note that students can change their course track or select multiple tracks in the Progress tab, so this assignment at registration is not permanent or irreversible.
Welcome Email Settings
The remaining registration settings allow you to create a template for an optional welcome email sent to every student who enrolls in the course.
Send welcome email
Choose whether to send a welcome email.
Don’t enable this setting if you’re expecting more than 25 students to register in one day. Google App Engine limits the number of emails to 25 per day, and emails over the limit will (probably) not be sent. If your sender account slightly exceeds the limit on rare occasions, GAE may get around to sending the over-the-limit emails. But you can’t know when - or even if - students will get them.
Email sender
Enter the email address of the sender of the welcome email. Because this email is sent through Google App Engine, the address must be a valid sender address for your App Engine account.
Learn more about adding authorized senders.
Email Subject
Enter the subject line for the welcome email. To personalize the email, you can use
-
{{student_name}}- the name the student entered during registration -
{{course_title}}- the title of the course for which the student registered
Here is an example subject line that uses both:
{{student_name}}, you have successfully enrolled in {{course_title}}
Email Body
Enter the text for the body of the welcome email. Personalize the email using
-
{{student_name}}- the name the student entered during registration -
{{course_title}}- the title of the course for which the student registered
For example, you begin your email
Hello {{student_name}},

Welcome to {{course_title}}!
In this course, you will ...
Link to join course forum/Google Group
If you have created a group for the course, you can include a link for students to join the group in the email.
http://groups.google.com/group/YourCourseGroup
where YourCourseGroup is the name of your group. You can find the URL on
your Google Group’s Information page
Link to unsubscribe to future emails
To avoid spamming, include {{unsubscribe_url}} in the body of the email.
This will add an unsubscribe link that allows students to unsubscribe from future
course emails.